Alocasia Portodora, also known as the upright elephant ear plant is one to marvel at with its large colorful foliage, veins, and general inviting look.
But this beautiful plant isn’t so easy to care for, due to its high maintenance requirements. Read on as I delve comprehensively into how to care for your Alocasia Portodora properly.
Contents
- What Does an Alocasia Portodora Plant Look Like
- Caring for Your New Alocasia Portodora
- Caring for Your Alocasia Portodora Plant
- Propagating Your Alocasia: A Step-By-Step Guide
- How to Repot Alocasia Portodora Plant
- Common Alocasia Portodora Problems and Solutions
- Quick Guide to Alocasia Portodora Plant Care
What Does an Alocasia Portodora Plant Look Like

Meet the Alocasia Portodora – a plant renowned for its stunning, ribbed, lettuce-edged green leaves that stand tall on robust, tuber-like stems.
Its fan-like leaves are often compared to an elephant’s ears, which has led to its nickname, the Elephant Ear Plant.
The unique look of the Alocasia Portodora adds an exotic touch to any indoor space, turning your home into a lush tropical haven.
Caring for Your New Alocasia Portodora
You’ve just brought home your very first Alocasia Portodora. Congratulations! However, hold your horses before you dive into caring for your new plant. Here are some pointers to ensure a successful early growth phase:
Hold Off on Repotting
It’s natural to want to nestle your new plant into your favorite pot right away. However, transplanting your Alocasia Portodora too soon could cause significant harm, potentially stunting its growth.
Repotting too soon can damage the plant’s delicate roots, leading to breaks or stress that may hinder further foliage production. So, wait a while before giving your Alocasia a new home.
Think Twice Before Fertilizing
If your Alocasia Portodora seems under the weather, resist the urge to add fertilizers right away. It may still have residual nutrients from the nursery.
Instead, examine your plant for signs of distress. It could be missing essentials like sunlight, proper watering, or the right temperature and humidity levels.
Don’t Overwater
Overwatering is a common cause of plant death, especially for nursery fresh ones. If you water your Alocasia Portodora while the soil is still moist, you risk waterlogging the soil, which can be detrimental to the roots.
Instead, allow the topsoil and roots to dry out before giving your Alocasia a drink.
Keep New and Old Plants Apart
While it may be tempting to place your new and existing plants together, refrain from doing so to prevent the spread of potential infections.
This applies whether the newcomer is from an unlicensed grower or your older plants have untreated conditions.
Keeping your new and old plants apart until it’s safe promotes a healthier environment for all your indoor plants.
Avoid Chemical Treatments
Applying chemical treatments like leaf shining sprays can do more harm than good to your Alocasia Portodora.
While they may enhance the leaf’s green hue, they can also block the stomata (leaf pores), hindering photosynthesis and effectively suffocating your plant.
For a safer alternative, clean the leaves with warm water and a clean cloth, or use neem oil for a natural shine.
Keep Away From Direct Sunlight
Plants especially the younger ones react negatively to sudden changes in the environment. Your new Alocasia Portodora Will follow suit, even though it’s a “sun-loving plant”, as it can be scourged by the intensity. The best approach is to introduce your new plant to the environment gradually.
Note: the only reason why a new plant can easily adapt to full direct sunlight is that it was already thriving in such conditions before your purchase.
Caring for Your Alocasia Portodora Plant
Below are essential practices to keep your Alocasia Portodora vibrant and thriving:
Watering Your Alocasia Portodora
Remember, watering frequency depends on the season. During the warmer spring and summer seasons, water your plant frequently, ensuring the soil dries out between waterings due to high evaporation rates.
However, in cooler autumn and winter seasons, watering should be less frequent, as the soil retains moisture longer.
Providing Adequate Light
The Alocasia Portodora thrives in bright, indirect light. Placing your plant near a south-facing window or under a shade can yield an optimal growth rate.
Maintaining Appropriate Temperature
Being a tropical plant, Alocasia Portodora prefers warm room temperatures. Keep your thermostat between 64°F (18°C) and 75°F (24°C). Lower or higher temperatures may result in frost damage or excessive evaporation.
Ensuring Adequate Humidity
Alocasia Portodora flourishes in high humidity, typical of tropical climates. Aim for a room humidity level of at least 60%.
For optimal growth, try to achieve more than 60% humidity using a humidifier, misting, grouping it with other plants, or placing it over a tray of pebbles filled with water.
Selecting the Right Soil
Alocasia Portodora thrives in well-aerated, well-drained, loose, and porous soil. A mix of peat moss, perlite, loamy soil, and compost in equal parts should suffice. The plant prefers slightly acidic soil with a pH between 5.5 and 6.5.
Fertilizing Your Plant
Fertilizers enhance the growth of your Alocasia Portodora by enriching the soil.
Consider using compost, applied to the topsoil, or water-soluble fertilizers with a balanced 10-10-10 formula.
Propagating Your Alocasia Portodora
In the right conditions, your Alocasia Portodora will produce offsets, or mini versions of the plant.
When this happens, it’s time to divide these offsets from the parent plant to propagate more Alocasia and prevent overcrowding. After division, you can complete the propagation process in two ways:
- Water Propagation
- Soil Propagation
Propagating Your Alocasia: A Step-By-Step Guide
Step 1: Uproot and Untangle
Begin by carefully removing your Alocasia from its pot and gently shaking off excess soil from the roots. The roots may be tangled or clumped together, so you’ll want to loosen them.
You can do this by rinsing them with a hose or soaking them in a water-filled container until they are straight.
Step 2: Cut Offsets
With your roots untangled, identify an offset, or a small copy of your Alocasia plant. Using a sterilized sharp knife, cut away the offset, making sure to include its roots.
Note: Alocasia offsets already have roots, so there’s no need to wait before starting the propagation process.
Step 3: Choose Your Propagation Method
With your offset ready, decide on the method of propagation. Either plant it directly in new soil (soil propagation) since it already has roots, or immerse it in a vase filled with clean water (water propagation).
1-Soil Propagation:
Plant the cleanly cut rhizome directly in a small pot filled with well-draining soil, preferably enriched with perlite. Position the plant in a spot with bright, indirect light.
Note: The stress of propagation may delay the appearance of new leaves, so be patient.
2- Water Propagation:

Rinse the rhizome to remove any remaining dirt. Then prepare a clear vase or container filled with tap water that has been left to stand in sunlight for 24 hours to remove any chlorine.
Now, place the offset in the vase for propagation, remembering to change the water periodically.
Note: Consider adding liquid houseplant fertilizer at intervals to boost the growth of your propagated Alocasia.
How to Repot Alocasia Portodora Plant
If the roots of your Alocasia Portodora are no longer benefitting from the potting soil, it is best to re-pot your plant. Here are steps to follow (make sure to read these completely before practicing):
- Trim overgrown roots of your Alocasia at the drainage hole
- Carefully extract your Alocasia from the soil
- Wash and untangle the roots
- Trim out the dead or rotten roots
- Fill up the new pot and transplant your Alocasia
Note: make sure the topsoil is an inch lower than the edge of the soil. Also, make sure the plant stands at the same height it was before repotting. So, ensure you mark its height.
Common Alocasia Portodora Problems and Solutions
1- Spider Mites
Spider mites pose a significant threat to the Alocasia Portodora plant. You’ll recognize their presence by the white webs covering your plant’s leaves. These pests pierce the leaf surface and suck out the sap, causing the leaves to yellow and brown.
Solution: Increase the humidity level of the plant’s environment, as spider mites prefer dry conditions. This can be done by using a humidifier, clustering plants together, or frequent misting.
If infestation persists, rinse the plant with room-temperature water or apply neem oil or insecticides. Be mindful of the insecticides you use, as some may harm the plant.
2- Mealybugs
Mealybugs suck sap from the plant and leave a powdery white residue. Their presence can cause the leaves to yellow or brown.
Solution: Treat your plant with cotton swabs soaked in isopropyl alcohol (70%) to clean the affected areas. If the problem persists, consider repotting your plant.
3- Aphids
Aphids are another sap-sucking pest, but they primarily target the stems, causing leaves to yellow, brown, and curl. Look for a sticky substance known as honeydew as a sign of their presence.
Solution: Flick aphids into a container of soapy water or spray your plant with a soapy water mixture or neem oil.
4- Scale Infestation
Scales are recognizable by round shell-like bumps on the plant’s stem or leaves. They excrete a substance called honeydew, attracting fungal organisms, leading to sooty mold. Left untreated, scales will cause leaves to yellow and drop.
Solution: For mild infestations, remove scales manually or apply alcohol or neem oil to the affected areas. For severe cases, prune the infected leaves and stems.
5- Bacterial Leaf Spot
This bacterial pathogen comes from the soil and appears as black, moist spots on the leaves surrounded by a yellow ring. Warm, humid conditions can trigger bacterial leaf spot.
Solution: Upon noticing the symptoms, trim out the affected areas and prevent the spread by spraying with a baking soda solution or applying natural soap or olive oil.
Also, water the roots directly and remove any rotting debris from the soil. To inhibit bacterial growth, use copper spray, plant activators, or microbial products. Remember to moderate the use of chemicals to prevent damage to your plant.
Root Rot: A Common Foe for Your Alocasia Plant
Root rot, a prevalent root and stem disease, emerges from a lurking fungal pathogen, usually present in untreated soil.
In its dormant state, the pathogen is relatively harmless, but beware of overwatering your Alocasia plant! Excessive moisture stimulates the pathogen, causing it to attack the plant’s roots.
Tell-tale signs of root rot include:
- Leaf discoloration
- Blackening of roots and stems
- A limp plant
Taking Action Against Root Rot
If you’ve ever tried to treat root rot, you know it’s virtually impossible, even if caught early. This stark reality underscores the importance of preventive measures. In the case of Alocasia, two primary steps can save your plant:
- Avoid overwatering.
- Thoroughly treat the soil that previously housed the affected plant before transplanting.
If you spot root rot early, don’t despair. First, uproot your Alocasia and trim off the affected roots.
Follow up with a quality fungicide to prevent further damage. Remember to refresh your potting soil before replanting your Alocasia.
Other Alocasia Plant Woes: Drooping, Yellowing, and Curling

If your Alocasia’s leaves droop, it may be a signal of pest infestation, incorrect watering, insufficient light, or a nutrient-poor soil.
Fortunately, you can rectify these issues with proper watering, effective pest control, improved lighting, and careful soil fertilization.
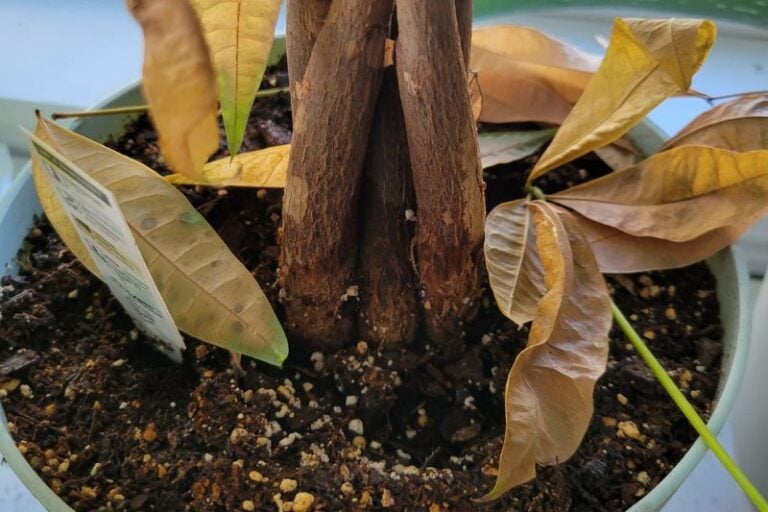
Yellow or brown leaves on your Alocasia Portodora can result from improper watering or lighting, or a lack of sufficient nitrogen in the soil.
Address this by regulating your watering schedule (avoid over or under watering), ensuring adequate light (a south or west-facing window is ideal), and enriching the soil with compost to boost nitrogen levels.
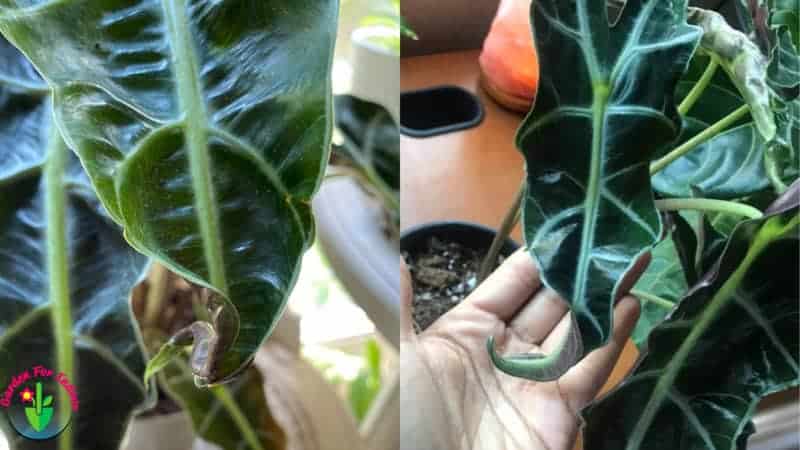
Leaf curling in Alocasia Portodora could be due to pests, incorrect watering, poor lighting, or other factors like frost, excessive fertilization (especially magnesium), and low humidity.
To tackle this, move your plant indoors where it’s warm and humid if cold temperatures are the cause. If excess fertilizer is to blame, your best bet is to re-pot your Alocasia Portodora.
Quick Guide to Alocasia Portodora Plant Care
| Origin | Southeast Asia |
| Scientific Name | Alocasia portodora |
| Family | Araceae |
| Common Name | Elephant ear plant |
| Type | Tropical plant |
| Max Growth (approx) | 15 inches |
| Watering Needs | Twice a week (summer) or twice a month (winter) |
| Light Requirements | Bright indirect light |
| Humidity | 60 to 70% |
| Soil (pH level) | Loose, well-drained and pest moss (5.5 to 7.0) |
| Fertilizer | Liquid fertilizer/ granules fertilizer |
| Season | Summer |
| Temperature | 64 to 75°F |
| Pests | Mealybugs, aphids, scales, spider mites |
| Diseases | Bacterial leaf spot, black root rot |
| Propagation | Clump or rhizome division |
| Pruning | Seasonal |
| Repotting | Annually |
| Toxicity | Toxic to pets and humans |
| USDA Plant Hardiness Zone | 11, 10, 9, 8 |