Some plants have a peculiar way of flaunting their beauty. The Alocasia macrorrhiza ‘Stingray’ stands out with its uniquely shaped foliage from other Alocasia varieties.
The Alocasia Stingray is a lovely houseplant that’s easy to take care of. However, if you’re a beginner, it might be a bit tricky to grow this plant.
| Scientific Name | Alocasia macrorrhiza ‘Stingray’ |
| Origin | Tropical regions in Asia |
| Light | Bright, indirect sunlight |
| Watering | When the top 2 inches (5 cm) of soil are dry |
| Temperature | 64 to 86 °F (18 to 30 °C) |
| Humidity | 40-70% |
| Soil | Moist but well-draining soil |
| Soil pH | 5.5 to 6.5 |
| Fertilizing | A balanced fertilization once a month in spring and summer |
| Pruning | Remove yellow or dying leaves |
| Propagation | Division of the rhizome |
| Repotting | Every 1 to 2 years |
| Toxicity | Toxic to humans and pets |
| Size | 59 inches (150 cm) as a houseplant |
Contents
- What is Alocasia Stingray?
- Alocasia Stingray Care
- 1- Light Requirements for Alocasia Stingray
- 2- Watering Alocasia Stingray
- 3- Maintaining Ideal Temperature for Alocasia Stingray
- 4- Optimal Humidity for Alocasia Stingray
- 5- Choosing the Right Soil for Alocasia Stingray
- 6- Fertilizing Alocasia Stingray
- 7- Pruning Alocasia Stingray
- 8- Propagating Alocasia Stingray
- 9- Repotting Alocasia Stingray
- Common Alocasia Stingray Problems
- Understanding the Toxicity of Alocasia Stingray
- Distinctive Features of Alocasia Stingray
- Frequently Asked Questions
What is Alocasia Stingray?

The Alocasia Stingray plant captures attention with its striking foliage as it resembles the shape of a marine creature commonly known as a stingray.
It has flat, leathery leaves that point upwards and are inwardly curved, topped with a noticeable whip-like tail.
This plant originates from Southeast Asia and is a perfect houseplant if you’re trying to achieve a tropical look. Alocasia plants also have a reputation for being good air purifiers.
So, you’re not just getting a beautiful plant, but also a functional decorative piece that helps clear the air of potential toxins. However, you need to exercise caution with the Alocasia Stingray since this plant is considered toxic.
Alocasia Stingray Care
Caring for the Alocasia Stingray plant is relatively simple. However, it’s not the best choice for novice gardeners.
If you want your Alocasia Stingray to thrive, you need to pay attention to the right lighting, moisture, temperature, and humidity.
Here are the specific care requirements for Alocasia Stingray to guide you:
1- Light Requirements for Alocasia Stingray
When meeting the light requirements for Alocasia Stingray, always consider its natural habitat. Alocasia species are usually found under tree canopies in the rainforest, so they’re used to diffused light, not full sun.
To meet the Alocasia Stingray’s light needs indoors, place it near an east or west-facing window where it gets at least 6 hours of indirect sunlight.
If it’s too hot, a sheer curtain helps diffuse the heat and protects the leaves from burning. You can add an artificial light source if sunlight is lacking.
2- Watering Alocasia Stingray
Generally, Alocasia plants have a high water demand. The soil must be moist but not too wet. Once the top 2 inches (5 cm) of the soil are dry, it’s time to water the Alocasia Stingray again.
Ensure the pot has enough drainage holes so that excess water can drain and root rot is prevented.
Given the Alocasia Stingray’s water needs, you might need to water the plant once or twice a week. But of course, this also depends on the season.
Naturally, you’ll need to water more in summer and spring than in winter. It’s up to you to adjust the routine accordingly.
3- Maintaining Ideal Temperature for Alocasia Stingray
Keep the plant in a warm environment. The ideal temperature range for Alocasia Stingray is between 64 and 86 °F (18 to 30 °C). This is usually achievable indoors at room temperature.
Avoid cold drafts as this plant has limited temperature tolerance. Sudden temperature changes can lead to severe damage to your plant.
4- Optimal Humidity for Alocasia Stingray
It’s important to note the humidity needs of Alocasia Stingray, as this helps the plant grow lush and healthy. If the humidity isn’t right, the plant shows signs of stress, like browning and curling of leaf tips.
You’ll get the best results if you maintain the ideal humidity for Alocasia Stingray, which is between 40 and 70%.
If it becomes too dry, you can turn on the humidifier or mist your plant. If you have other leafy plants, group them together to increase the surrounding humidity.
5- Choosing the Right Soil for Alocasia Stingray
The soil for Alocasia Stingray needs to be moist but not too wet. To achieve this, prepare a soil mix that has good drainage but also retains moisture well. You can mix one part soil, one part perlite or coarse sand, and one part peat moss.
Test the soil drainage of your Alocasia Stingray by continuously pouring water. Excess water should seep out of the pot within a few minutes. Also, ensure the soil pH is right. Ideally, the pH for Alocasia Stingray should be between 5.5 and 6.5.
6- Fertilizing Alocasia Stingray
Feeding your Alocasia Stingray with fertilizer can be quite beneficial as it supplies the growing plant with essential nutrients. Incorporating organic matter into the soil is great as it releases nutrients slowly.
However, if you need the nutrients to be available more quickly, you can use synthetic fertilizer. Look for a balanced NPK ratio like 10-10-10 or 20-20-20.
Before applying the fertilizer, make sure to dilute the solution to half its strength and moisten the soil beforehand.
This practice reduces the risk of fertilizer burn. Limit fertilizing to every other week during the summer and spring.
7- Pruning Alocasia Stingray
Pruning Alocasia Stingray is relatively simple. You only need to remove the leaves that are dying, old, diseased, or discolored.
This practice helps maintain the plant’s aesthetic appeal and health, promoting the growth of new shoots and leaves.
When you want to prune your plant, identify the parts that need to be removed first. Then prepare your tools by disinfecting them, and don’t forget to put on your gloves. Proceed to cut the Alocasia Stingray carefully, ensuring clean, diagonal cuts.
8- Propagating Alocasia Stingray
You have several options when it comes to propagating your Alocasia Stingray. You can choose to propagate by rhizome division, offset division, root cuttings, or even using seeds. Among these methods, rhizome division is the most efficient.
To propagate Alocasia Stingray via rhizome division, start by removing the entire plant from its pot. Brush off the soil and wash the root ball. This will give you a better view of the rhizomes.
With a clean knife, cut each rhizome individually to separate them from the root ball. Plant each rhizome separately in individual pots. Within a few weeks, you’ll start seeing the baby Alocasia Stingrays growing independently.
9- Repotting Alocasia Stingray
The Alocasia Stingray needs to be repotted every two years. While this plant prefers to stay in a smaller pot, it eventually needs a slightly larger vessel to allow room for growth. Opt for a pot that is at most 2 inches (5 cm) larger than the old one.
Alocasia Stingray repotting is best done in the spring or summer, as these seasons mark the most active growth period for your plant.
Thus, the chances of a quick and healthy recovery after repotting are higher. During this process, make sure you don’t damage the roots to keep the plant in good health.
Common Alocasia Stingray Problems
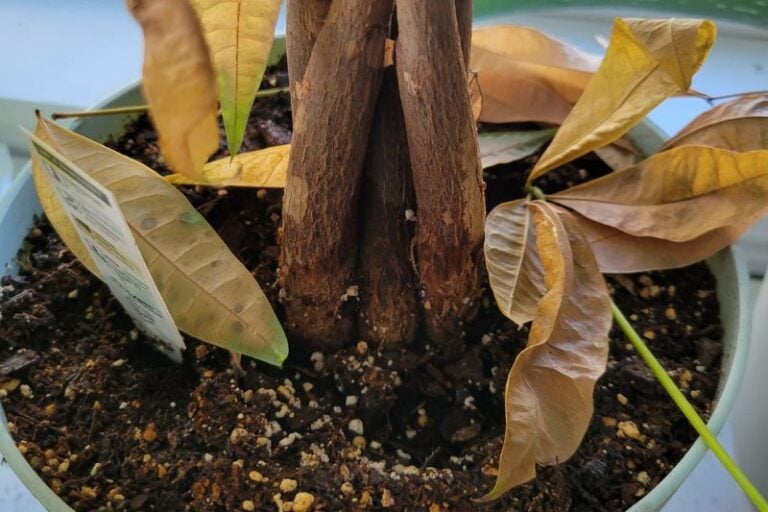
There are various ways to identify problems with your Alocasia Stingray. Typically, however, you can spot visible signs on the leaves such as distortions and discolorations.
These indicators tell a lot about the health status of your plant. The most common issues that can occur with Alocasia Stingray are usually caused by specific pests and diseases.
1- Pests
Alocasia Stingray is susceptible to pests like aphids, spider mites, mealybugs, scale insects, thrips, and whiteflies, which commonly affect indoor plants.
Due to their small size, they are often hard to detect unless they’ve already spread significantly. So, it’s best to always keep a keen eye on specific parts of your plant. For instance, bugs tend to hide in the cavities of the plant.
Prevention is the key to combat these pests. Always provide optimal growth conditions to avoid stressing your plant. If they manage to infest your plant, you can rid them using neem oil or diluted insecticidal soaps.
2- Diseases

There are certain diseases in Alocasia Stingray that you should watch out for. These include root rot, leaf spot disease, botrytis, rust, powdery mildew, and southern blight.
Root rot manifests as a yellowing of leaves and stems as well as stunted growth. Southern blight is marked by the rapid loss of older leaves and root decay.
Botrytis appears on the leaf surface as yellow spots and streak wounds. On the other hand, powdery mildew looks like a powdery coating on the leaves of your Alocasia Stingray plant.
Most of these diseases are caused by excess moisture. So, always adjust the growing conditions accordingly to prevent these fungal diseases from thriving.
3- Growth Issues
Growth issues are normal in any plant species. After all, your Alocasia Stingray is a living being and it too is prone to setbacks.
Most often, you can tell by the appearance of the leaves if you have a sick plant or not. Pay attention to the discolorations you see. They might be hinting at a more serious problem.
Understanding the Toxicity of Alocasia Stingray
It’s crucial to know that the Alocasia Stingray plant possesses significant toxicity. This is common amongst Alocasia species and other plants within the Araceae family.
They contain large amounts of calcium oxalate crystals, which are toxic to both humans and pets if ingested. As a responsible plant owner, it’s your duty to ensure this plant is safely kept.
Impact on Humans
While adults are unlikely to ingest any part of this plant, they may experience skin irritations if they come in contact with the plant sap.
Therefore, if you plan on inviting friends over, it’s best to label this plant, warning them of its toxicity.
Children, on the other hand, are often very curious and might attempt to swallow the leaves or stems.
This is extremely concerning, as the calcium oxalates can severely irritate the mouth and other parts of the digestive system.
To ensure safety, I’ll place my Alocasia Stingray in a spot higher than what the children can reach.
Impact on Pets
Growing an Alocasia Stingray can be a bit more challenging, especially if you have pets at home. They can be more susceptible to the plant’s toxicity, which can have a more severe impact on their health.
The crystals from the plant can penetrate tissue, causing irritation in the mouth and gastrointestinal tract.
Symptoms include mouth swelling, drooling, vomiting, diarrhea, and nausea. If your dogs and cats display these symptoms, it’s crucial to seek immediate veterinary treatment.
As a wise pet parent, always keep this plant out of your pets’ reach to prevent future issues.
Distinctive Features of Alocasia Stingray
Primarily known as a leaf plant, the Alocasia Stingray is an evergreen perennial popular for its uniquely shaped leaves that resemble a stingray.
It has a striking appearance, especially as an indoor plant. Although it’s rare, Alocasia Stingray also produces flowers.
Foliage

If you’ve seen a stingray before, it will probably be easy for you to identify the Alocasia Stingray. The flat, triangular leaves each have an upward tail extension, making this plant distinctive.
The foliage of Alocasia Stingray is a dark green color with silvery-green veins.
With the proper care, these leaves will continue to remain lush and attractive. However, when stressed, you’ll notice discoloration such as fading of color, yellowing, browning, and the development of lesions.
These are indicators of underlying problems. It’s best to trim back the affected leaf to prevent further damage.
Flowering
You may be wondering what an Alocasia Stingray bloom looks like. Catching a flower or two can be challenging as Alocasia plants take a long time to form flowers. Hence, flowering is a rare event, especially in house-held plants.
But to give you a clear idea, imagine the flowers of peace lilies. They have a spoon-shaped cup known as the spathe that surrounds the spadix, or the actual flower.
The spathe is white or greenish in color. They usually appear in late summer and last about five days.
Size and Growth

The size of Alocasia Stingray can reach an average of 5 feet (150 cm) when planted in pots indoors.
However, when planted outdoors, it can grow up to 15 feet (460 cm) high and 8 feet (245 cm) wide. In its natural habitat, it grows 3-5 feet (90-150 cm) per year.
But if you want to control the size of the plant, you can pot it in smaller containers. With limited soil and resources, the plant will remain a dwarf version.
That’s the key to keeping the plant manageable indoors. Of course, you’ll need to repot every two years to replenish the spent soil.
Frequently Asked Questions
How can I identify an Alocasia Stingray?
One look at the leaves and you’ll instantly know it’s an Alocasia Stingray. The plant’s green leaves resemble the appearance of a stingray with flattened bodies and a long tail.
How fast does Alocasia Stingray grow?
An Alocasia Stingray has a growth rate of 3 to 5 feet (90 to 150 cm) per year when grown outdoors. It’s a fast-growing plant. However, when indoors, the growth is moderate due to the limited resources.
How can I make my Alocasia Stingray grow faster?
Keep the soil moist, maintain high humidity, provide just enough light, and warm temperatures. The right growing conditions avoid stress and make the plant happy.
Why is my Alocasia Stingray dying?
The causes can range from over or under-watering, lack of light and humidity, nutrient deficiency, pest infestation, and diseases. There are many probable causes that you need to investigate first.
Why is my Alocasia Stingray drooping?
Drooping can be a result of watering issues, temperature stress, repotting stress, or lack of light. It can also be a combination of many of these factors.