Aloe vera are succulents, and like many of those thick-leaved, water-retentive plants, they tend to be tough and resilient. That doesn’t mean that they are totally bulletproof, however, and if you don’t keep an eye on them, they can have problems.
Don’t assume that because they are tough, they can be ignored altogether. One of the most important things to get right is watering.
The most common cause of aloe vera dying is overwatering, which leads to aloe root rot. Dry out between waterings and only water when the top 1-2 inches of soil is dry. A heavy pest infestation, lack of nutrition, incorrect soil pH can also cause severe problems for aloe vera.
Overwatering is the biggest threat they face, but the good news is that after reading this article it is a problem that you should easily be able to avoid.

Contents
How To Know if Aloe Vera is Dying
A healthy Aloe vera has handsome upright leaves that are sword-shaped and usually lined with small pointed teeth. The color of a healthy plant is green/gray and the texture is firm and juicy.
Usually, it is the leaves that will first alert you to any signs that you may be facing a problem.
If they start to deviate in any way from the description given above, then you need to examine your plant carefully because it might be suffering.
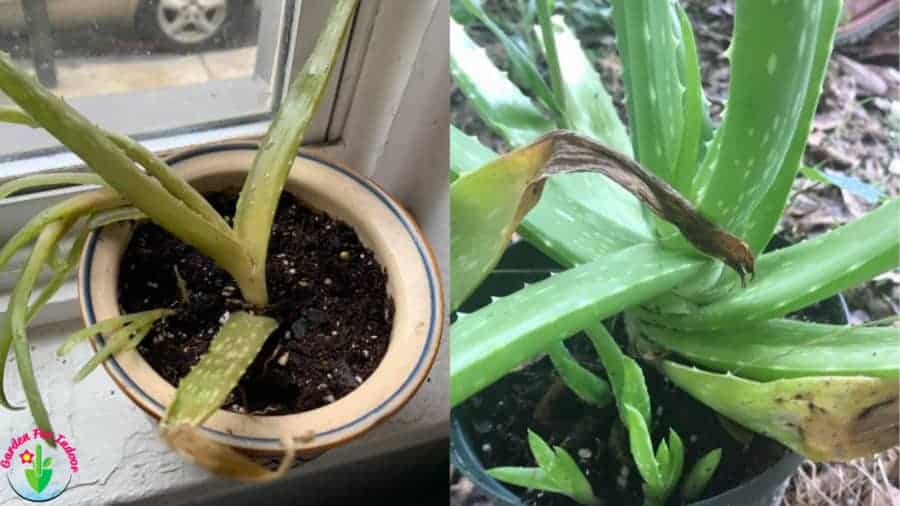
Typically, an unhealthy plant will lose leaf texture and the leaves will become soft and will begin to droop.
In addition, the color of the leaves will move from gray-green to either yellow or an insipid brown color.
Both of these color changes are indicative of health issues which we will look at in more depth further into the article.
Phytophthora and Pythium Stem and Root Rot
These soilborne bacterial diseases attack the roots and gradually make their way up into the stem and leaves of the plant.
Symptoms are dark brown and mushy leaf tips and wet patches on the leaves. Both of these diseases can prove fatal to your plant and their symptoms are so similar that it would take specialized laboratory tests to differentiate one from the other.
Once the leaves are soft like that they won’t perk up. After you cut them they might still come back as long as the roots were not damaged.
If you suspect that your plant is suffering from this disease, isolate it from other plants and repot it.
If the plant shows no signs of recovery within a few days, don’t waste your time attempting to revive it.
Instead, destroy it and make sure you dispose of both the soil and the plant so that there is no risk of cross-infection with other plants in your collection.

Save Aloe Vera from Root Rot and Stem Rot
The most reliable way to save a plant from these fungal diseases is to repot them as soon as possible. Root rot is probably the biggest risk that your Aloe vera faces.
This all-encompassing term is generally a result of overwatering although, it can be also caused by fungal diseases carried in the soil.
- If you suspect that this is the issue you are facing, the first thing you want to do is to remove the plant from its pot.
- It is highly likely at this stage, that you will notice the potting soil is either damp or wet. This may be accompanied by a damp swampy odor.
- Without damaging the roots, remove as much of the wet soil as possible and then place the plant on a sheet of newspaper and allow it to dry out. This process may take several days during which time you don’t want to expose the plant to direct sun.
- Once the root ball has dried out examine the roots closely. Those that have begun to rot will have lost their texture and will have turned a brown color.
- The damaged roots are no longer effective and you should cut them away with a pair of sterilized scissors until you get back to healthy white rootstock.
- Once you’re sure that all the infected root material has been removed, you can give the root ball a light dusting with fungicidal powder.
- After that, repot your plant using clean potting soil into a pot that is roughly the size of the root ball.
The potting mix you use is important. You want one that is free draining and the easiest thing to do is to purchase a proprietary cactus mix from your local garden center.
If that is not available, you can make your own by mixing sterile potting soil with fifty percent perlite or gravel to increase the drainage speed.
Another factor that will speed drainage is the material that the pot is made from. I prefer unglazed terracotta pots because they allow moisture to evaporate through the sides and further decrease the risk of too much moisture building up.
The potting mix will already be slightly damp and you won’t need to water this plant for at least a week.
Place it in a bright position but not in direct sunlight and watch it carefully. Hopefully, it will begin to start to show signs of recovery, and although the damaged leaves will not stand upright again, new leaves should start to appear towards the crown of the plant.
Aloe Vera Dying from Overwatering
Unfortunately, the most common reason that Aloe vera goes into decline is that well-intentioned owners give them too much water.
Symptoms over an overwatered Aloe are firstly soft wilted leaves. These often go brown and may be accompanied by edema which is watery blister-like patches.
The causes may be purely from giving too much water or they may be a result of inadequate drainage. This is common if you use the wrong soil or there is no drainage hole in the pot.
Save Dying overwatered Aloe Vera
- The first thing to do is to stop watering and check that there is adequate drainage capacity.
- Just letting the soil dry out may resolve this issue but if it has become too extreme then I would consider repotting my plant.
- Allow the root ball to dry out and follow the repotting instructions above.
Aloe Vera Dying from Underwatering
After overwatering, underwatering is the most likely problem you are likely to face. Confusingly, symptoms are quite similar in both instances and it can be easy to get the two problems muddled.
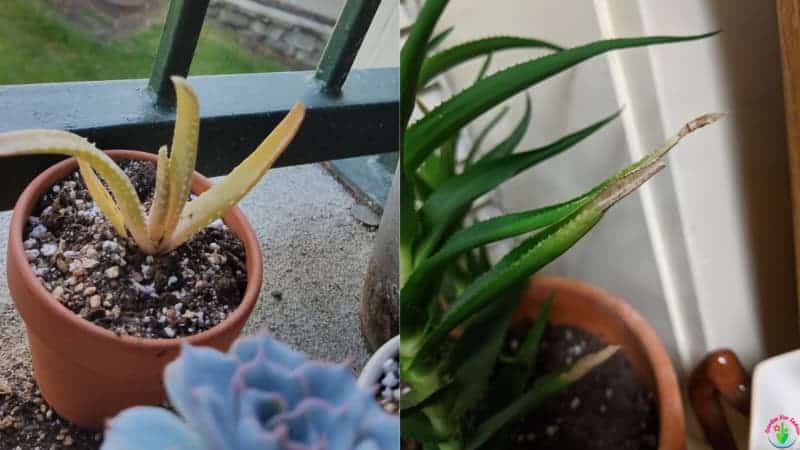
As with overwatering, leaves will start to lose texture and droop but the most noticeable difference here is that underwatered leaves tend to have brown tips and marks along the leaf margins.
These start to become hard and brittle. The sure-fire way to tell the difference is to feel the soil.
Underwatered soil will be dry and parched in contrast to the marshy feel of the overwatered soil.
A precursor to the drooping leaves is often a slightly wrinkled appearance on the underwatered leaves of your plant. If your plant has enough water the leaves will always be firm and juicy.
To avoid both overwatering and under watering problems, what you need to do is establish a good watering regime which is what we shall look at shortly.
Save Aloe Vera Dying from Underwatering
Very often, in the case of under watering, simply giving your plant a good soaking and allowing all excess water to drain away will be all that is required to bring it back to full health.
These plants have evolved under dry conditions and are far less likely to succumb to underwatering than they are to overwatering.
Brown and brittle leaf marks will not, unfortunately, recover as this is dead material. Correct Watering for Your Aloe Vera
The Correct Watering Method
Ideally, you want to get into a position where you know how to water your plant and are able to avoid both overwatering and underwatering problems. Actually, this is really very simple.
Rather than adopting a schedule that will see you watering your plant on a regular basis regardless of conditions, you need to establish a regime that will keep the soil moist enough for the plant to thrive, but not so wet as to cause overwatering symptoms.
The easiest way to achieve this is by feeling the potting soil. This plant can happily go for two to three weeks between each watering, although that is dependent on a number of factors such as air humidity, ambient temperature, and the retentiveness of the soil.
Even the size of the plant changes how much water it will need, which is why you can’t really rely on a schedule alone.
What you want to do is to allow the top one-third of the potting mix to dry out entirely before each watering.
You can check this by using a moisture probe or simply poking your finger into the soil until it is a third of the way down the pot. You will quickly learn to feel if the soil is still moist or not.
Once the potting mix has dried out enough to warrant watering, stand the pot in a basin or sink and apply water to the top of the soil until it runs out through the drainage hole in the base of your pot.
Allow that extra water to drain away completely before replacing the pot in its plant saucer. If you don’t do that, water that collects in the saucer will prevent the water from draining and the soil will retain too much moisture.
Try not to wet the leaves in the watering process. Wet leaves can facilitate mold and other health problems.
Lack of Nutrients
People often ask me if they should fertilize their Aloe vera and if so, how often? Symptoms that your plant lacks nutrients are a lackluster appearance and little or no new growth during the growing season.
How to Supply Additional Nutrients
Providing you have used good potting soil, nutrients ought not to be a problem. At the most, apply a general-purpose liquid house plant food once a month during the spring and summer months when you do your watering.
Further Aloe Vera Problems
We are now going to look at some of the other problems that you may face with your Aloe vera. The good news is that these problems are both rare and easily dealt with.
They are far less likely to cause the demise of your plants and once you have mastered your watering technique, you’re really three-quarters of the way to overcome all other issues.
- Aloe Vera Leaves Yellow and Soft: This symptom occurs in the early stages of excess watering. Think of it as an early warning system.
- Solution: Stop watering and ensure good drainage is in place in terms of both soil and a hole in the base of the pot.
- Aloe Vera Turning Brown and Limp: This is normally the next stage from leaf yellowing and occurs when the overwatering stress starts to become extreme.
- Solution: Repot your Aloe.
- Too much sun: Many people place their Aloe vera outdoors during the summer months and that is fine, but it needs to be done with care. These plants like bright indirect light and they can easily be sunburned. This can happen if they are not positioned carefully indoors, but it is very common when they are moved outside. The overexposed aloe plant will quickly turn brown and dry out.
- Solution: To avoid this, move the aloe vera out gradually and place it in a shaded position for a few hours each day. Over a period of about two weeks, it will have adapted to the brighter outdoor conditions and you can start to leave it outside.
- Low temperatures. In sharp contrast to too much sun, is too cold. This almost always occurs with plants when their loving owners move them outdoors for the summer and then forget to bring them indoors again when the weather turns. Just a touch of frost is all Aloe vera needs to kill it. Leaves will go brown, droop badly, and then go black if frost-damaged.
- Solution: The ideal temperature range for an Aloe vera is between 55 and 80° F (13 – 27°C) If you maintain that temperature range which is what most houses fall into, your Aloe will be fine.
- Not enough light. If your Aloe does not get sufficient light it will start to change shape as it spreads its leaves to capture as much of the light as possible. At the same time, the leaves will fade and become a paler green color that is probably best described as looking anemic.
- Solution: The plant needs bright light but not direct sunlight. A south-east-facing windowsill tends to work well.
- Incorrect pH: Ideally, you want to grow your Aloe in soil with a neutral pH. If you suspect that the soil falls too far out of that range in either direction then you can conduct a soil test. Testing kits are cheap and easy to use. Here is a pH testing kit that I recommend from amazon.
- Solution: If the soil is far from neutral then repot into a fresh potting mix using a cactus mix or the recipe above.
- Re-potting problems: Because aloe vera is so forgiving, it can normally be rehoused without any issues. What does sometimes happen is that the owner waters the plant in after re-potting? This is an understandable error because watering is common practice, especially when panting outdoors. In the case of Aloes, watering in is a bad idea because the soil is already likely to be slightly damp, and adding further moisture will bring on all the risks and symptoms associated with overwatering.
- Solution: When you do repot an Aloe, pot it into a pot slightly larger than the one that it is coming out of and don’t water it for the first week. Always make sure that the new pot has sufficient drainage capacity.
Aloe Vera Dying Due to Pests
Your healthy Aloe vera will normally be pest-free. They have thick skins protected by an outer cuticle that sap-sucking insects battle to penetrate.
That all changes if your plant is weakened by some other health issue such as the ones we have been looking at.
The softer leaves are suddenly easier to penetrate and become far more attractive to pests.
Mealybugs

Small sap-sucking insects that look like a dusting of flour or tiny balls of fluff, these characters love to hide out in leaf nodes and joints and suck the sap from there.
They are easy to deal with once you spot them but like to use concealment as their primary means of defense.
They can be wiped away with insecticidal soap or with Neem oil on a cotton bud or soft cloth, but you need to be looking for them to see them.
Scale Insects

These pests like to fool you by not looking like pests at all. They look like small round scabs, often on the lower portions of the leaf near the crown.
What they are are sap-sucking insects who hide beneath a small armored shell as they suck away the nutrients from your plant.
Once they have established their position they never move. They simply spend their lives in one place beneath their armored fortress feeding on the juice produced by their target plant.
These insects can be dealt with simply by scraping them off with your fingernail or with the back of the blade of a knife.
Aloe vera aphids

These little aphids hide at the base of the leaves from where they suck the plant’s sap. Like many aphids, they excrete a product called honeydew which results in a gray sticky liquid forming on the plant.
This will often attract ants. The aphids succumb easily to insecticidal soaps or neem oil
Although pests are not a common problem, they will speed the decline of an already weakened plant.
The one ray of light here is that all of the pests that are most common to Aloe vera are easy to deal with without needing to resort to harmful chemicals.
Your most effective weapon here is going to be the close observation of your plant.
Pay particular attention to all of those little cracks and crannies where they can hide easily, and be super vigilant if the plant is suffering from other health issues.
How Not To Kill Your Aloe Vera
- First and foremost, do not overwater the plant….ever.
- Develop a watering regime rather than watering to a schedule.
- Use free-draining potting soil.
- Keep out of direct sunlight but in a bright position.
- Only feed during the spring and summer growing periods and then only modestly.
- Maintain temperatures of between 55 and 80°F (13 – 27°C)
- Introduce your Aloe to any outdoor position gradually.
- Bring it in again before it becomes too cold.
- Close observation is your best weapon against watering issues, pests, and any other problems the plant might have.


