African violet is one of the most beautiful houseplants you can have. That is unless it has become mushy or discolored as a result of too much water.
Many houseplant gardeners make the mistake of overwatering. When trying to care for your plant, it is easy to overdo it.
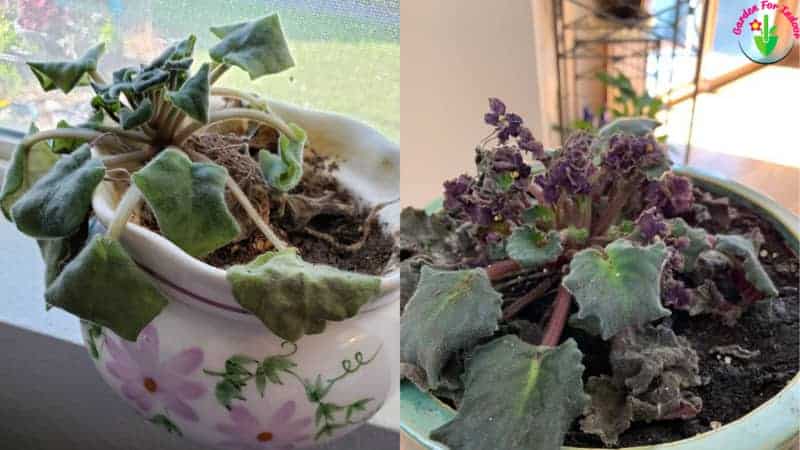
- Check for major damage and relocate to a cool, shaded location.
- Remove any damaged leaves or blooms.
- Examine the soil
- Disinfect the soil and cut off any damaged roots.
- It should be dried out.
- Repot into a new pot with fresh/disinfected soil.
- Water only when the top 1-2 inches of soil is dry.
But, by the end of this post, you’ll know exactly how to fix (and avoid) overwatering your African Violet!
Contents
Overwatering Vs. Underwatering: How to Tell the Difference
If you want your African Violet to thrive, you must understand its best watering practices.
When it comes to African Violet care, one of the most common mistakes people make is overwatering.
It’s normal to become enamored with your plant to the point where you water it regularly.
You’ll have problems if you water your African Violet too soon after it has dried out. Overwatering will cause damage to your African Violet.
Too much water will suffocate your African Violet and cause it to rot.
On the other hand, if you let the soil dry out too much, it will suffer from a lack of moisture problem.
You will eventually lose your plant due to a lack of water because it causes nutrient deficiency.
The plant can’t get the soluble nutrients from the soil if there’s no water available.
By looking at the soil, you can tell if your African Violet is getting enough water. If the soil is dust-dry, cracked, and firm, you should water it more frequently.
In addition, the leaves will let you know if they require additional water. If they are dry and crispy, dark on the edges, or your African Violet is no longer flowering, you may need to water them more.
Signs of Overwatered African Violet
Brown Spots on Leaves
Brown spots on your African Violets are never a good thing. Overwatering harms the root system by causing root rot, and as a result, the plant is cut off from the nutrient supply system.
Your African violet leaves will develop yellow and brown spots if you do not provide magnesium or nitrogen.
Overwatering can sometimes cause edema, caused by the plant consuming too much water. Extra water consumption harms the cells of the African violet leaf cells.
If it has edema, you will notice brown, wart-like spots near the base of your African Violet’s leaves.
Any leaves with brown spots should be removed. Unfortunately, once brown spots appear on the leaves, they cannot be revived.
By removing them, your African Violet will be able to grow new, healthy leaves more easily.
Root Rot And Foul Smell From Soil
An excessive amount of watering encourages the growth of fungi in the soil.
The fungus that grows will rot the roots if the soil does not dry completely between waterings or if the drainage system is not functioning correctly.
For African Violet Root Rot, there are a few things you can do to make things better. Read this article for step-by-step instructions.
Remove the plant from its pot and clean up any rotten soil before planting it again. After that, look into the stems and roots.
Remove brown or mushy roots to ensure your plants have strong, healthy roots.
Disinfect the remaining roots by dipping them in a fungicide solution after you’ve cleaned out the infected areas.
Repot your African Violet in a well-drained, clean bed of potting soil. (New soil is ideal, but cleaning the existing soil should suffice if Root Rot is minor.)
We have a limited amount of time! Because root rot spreads quickly, you’ll have a better chance of preventing it if you act quickly.
Removing any leaves that have developed brown spots is a good idea. Unfortunately, once the leaves develop brown spots, they will be impossible to recover.
By removing them, your African Violet will have an easier time producing new, healthy leaves.
Crown Rot
Crown Rot is diagnosed and treated in the same way that Root Rot is. The main distinction is where the rot has taken hold.
It is possible for root rot to occur on any of the roots, and the damage can be minor or severe. Crown rot is a disease that affects the roots at the top of the system.
Complete the Root Rot treatment steps and spray a fungicide on the root system to treat Crown Rot. Be aware that if your plant has severe Crown Rot, it may not survive.
Mold Growing on Soil
If you find mold in your soil, that is a clear sign your African Violet is getting too much water. Moldy white dots will appear on the top layer of the soil.
This mold won’t threaten your African Violet (or your family). But, it is still important to remove it as soon as you notice it.
You may be able to scrape the top layer of soil off and get rid of all the mold that way. You can also kill the mold with a diluted hydrogen peroxide mixture.
Use one part hydrogen peroxide to five parts water. If the mold extends beyond the top layer of soil, it’s time to repot.
Shriveled Appearance and Mushy Stems
If your African Violet’s stems are mushy, or the plant has shriveled, you are overwatering. A healthy plant will look solid and vivacious, with firm stems. There is an issue if the stem has any give when you squeeze them.
Mushy stems indicate a fungal infection created by too much water. A shriveled appearance is another sign that your African Violet has rotted. In both cases, remove the diseased bits, clean the plant, and allow it to dry. (Source: Iowa State University)
Wilting
A wilted African Violet can mean one of three things. Either you are not watering enough, you are watering too much, or you have pests. The soil will be the key to identifying which it is.
You are overwatering if your African Violet has wilted and the damp soil.
This drowns the roots, and the African Violets cannot get the oxygen they need. Repair any damage, and allow your African Violet to dry out.
Look for pests if your soil does not feel too dry or wet. Cyclamen mites and Mealybugs are the most common pests for African Violets.
To get rid of pests, you need to clean your leaves. You can suffocate the pests by spraying your leaves with neem oil or insecticidal soap.
If you have to rub alcohol around your house, you can wipe each leaf with it to rid your African Violet of cyclamen mites or mealybugs.
Yellow Leaves
Yellow leaves are another sign of moisture stress from overwatering. If your African Violet has yellow leaves, remove them and check the rest of the plant’s health.
If your leaves are yellow, there is a good chance your roots have rotted, and you will need to do some damage control.
Wrinkled Leaves
Wrinkled leaves indicate that overwatering has caused significant issues to your roots. Wrinkling signifies that no water can travel up the roots to the plant tissue.
Take a look at your roots. Healthy roots should be white and plump.
If your roots are brown and mushy, they need to go. Wrinkled leaves may signify that most of your roots have rotted.
If you still have viable roots, it is worth it to clean them and repot. Unfortunately, if the roots all look brown and mushy, it is time to try again with a different African Violet.
Curled Leaves
Curled leaves are a sign of overwatering. But, it is also a sign that the temperature of the water is causing stress to your African Violet.
If you are watering with cold water, it will chill the roots of your African Violet.
This causes the leaves to curl downward. Room temperature water is best, as it reduces the potential for any temperature shock.
Read this article to revive your dying African violet.
Saving Your Overwatered African Violet
You will need to follow these steps to heal an overwatered African Violet. There is a brief list and then a detailed description below.
Step One: Assess the Overall Damage
It is essential to see how damaged your overwatered African violet is.
When you find few leaves have brown spots, but your stems are firm and healthy, you will not need to rehabilitate as much as if the disease is present in other areas.
If any steps below don’t apply to your plant, feel free to skip ahead until the steps are applicable.
Now, If your roots are healthy, there is no need to remove the damaged ones, etc.
Step Two: Remove Damaged Leaves and Blooms
Remove any yellow leaves, leaves with brown spots, or wilted blooms.
Note: Do not remove leaves that curl downward from temperature shock. As long as they look healthy in every other way, leave them.
As you adjust the temperature of the water, they should revive themselves.
Clearing the damaged leaves allows your African Violet to focus on healing.
It no longer has to spend energy sending nutrients to areas of the plant that are non-revivable.
First, wash your hands. Remove damaged leaves/blooms by pinching the leaf with your fingers near the base of the stem.
If you prefer to cut the leaves off, ensure that your scissors are clean and sharp.
Removing near the soil line sets your African Violet up for success in growing new leaves/blooms.
Step Three: Assess the Soil
Now we get to the heart of the issue. Overwatering causes many issues for the soil and root system.
It’s essential to understand your soil’s condition before you can work on fixing it.
Remove any mold growing in the soil. Then take your African Violet out of its pot to examine the root system.
This is an excellent time to add some extra drainage to your pot.
Broken bits of terra cotta pot, large rocks, and recycled plastic all work well.
Place these at the bottom of your pot before repotting to help the water drain through the soil easier.
Step Four: Remove Damaged Roots and Clean the Soil
Removing any damaged roots that you find during the inspection is critical. Your plant won’t be able to recover if all the damage is not removed first.
To do this, use your fingers to dislodge the infected soil and remove rotten roots.
Remember, these will be brown and mushy. African Violet’s roots are delicate, so move gently with this step.
You don’t want to accidentally break off any healthy roots.
Clean off the remaining roots and use fresh soil and a new pot to repot your African Violet.
Getting new soil is best, but it is possible to disinfect your soil.
Try washing it with a bleach and water solution (one-part bleach to five parts water), and allow it to dry.
You can also use a fungicide or a homemade hydrogen peroxide solution (diluted the same as the bleach).
It is best to buy new potting soil if possible. Then you cut the risk of reinfection.
Step Five: Dry it Out
Before you repot your African Violet leave the plant out of the pot for a bit to dry.
Place the plant with the remaining roots and soil on a safe surface overnight.
Laying down some newspaper or putting it in an old cardboard box can reduce the mess.
This gives the roots and soils a chance to dry out more accessible than they could do in a pot.
Leave your plant there for a day until the soil seems nice and dry. Leave your African Violet somewhere safe if you have pets or small children.
Step Six: Repot
Once the soil dries, it is time to repot your African Violet. You can clean and disinfect the pot that your African Violet was in before.
But if you had significant Root Rot, it’s worth it to get a new pot. This reduces the chance of repeat infection.
Make sure that your pot has suitable drainage holes in the bottom.
Boost the drainage potential by adding large rocks, broken terra cotta, or plastic bits to the pot’s bottom. Then plant your African Violet in fresh soil.
If you are purchasing a new pot, you might want to consider a self-watering pot.
You pour the water into the pot, and then the African Violet takes what it needs without sitting in the water.
They remove much guesswork and can be a great tool if you are worried about inconsistent watering.
Step Seven: Water Smarter
Once your African Violet has recovered from too much water, this step is critical.
A repeat offense will be more brutal to come back from.
Listening to cues from your African Violet will set you up for better success than trying to create a water cycle based on the calendar.
Water your plant when the top 1-2 inches (2.54-5.08 cm) are dry.
This is roughly the distance to your first knuckle, but if you’d instead not stick your finger in the pot you can also purchase a water level marker.
If there is moisture in that top layer of soil, leave it a bit longer. Listen to your plant, and you should find a schedule that will help your plant thrive!
Common Watering Mistakes
| Mistake | How to Avoid |
| Inconsistent Watering | Check the soil levels regularly. Water as soon as the soil is dry. Consider using a self-watering pot. |
| Watering too Much | Only water when the top of the soil is dry. This will reduce the chance of overwatering issues. |
| Wet Soil from Overwatering | Water only when the soil has dried out. Water is enough to sustain the plant, but the soil should never be sopping. |
| Watering the Leaves and Not the Roots | Be careful to water the soil only. Wetting the leaves will cause spotting. |
| Watering During the Heat of the Day | This is an inefficient way to the water. Watering in the mornings will allow your African Violet to soak up the water without the heat evaporating any. |
Frequently Asked Questions
Why are the leaves on my African Violets soft, limp, and mushy?
When an African Violet gets too much water, the leaves will often retain some of the excess water in the leaves. This will cause the leaves to soften and become limp and mushy
How do I know if my African Violet has Root Rot?
Examine your soil and root system to identify Root Rot. Healthy roots are white and plump. Roots that have Root Rot will be brown and mushy.
It is essential to clear the diseased roots, clean the soil, and repot them in a clean pot.
What is a self-watering pot?
A self-watering pot allows you to water less frequently. You pour water into a reservoir that does not touch your African Violets’ soil or roots.
As the water evaporates, it moves to a new chamber from which your African Violet can drink.
This reduces the chance of overwatering because it is a regulated system. It is a popular option for people who keep African Violets in their homes.
Should I top or bottom water my African Violet?
African Violets do well with both top and bottom watering. When possible, it is important to not water the leaves. This can cause spots on the leaves.


