The Poinsettia (Euphorbia pulcherrima) is a gorgeous plant that has become ubiquitous with Christmas in many northern countries.
They bring a bright splash of color at a time of year when many plants are not looking at their best.
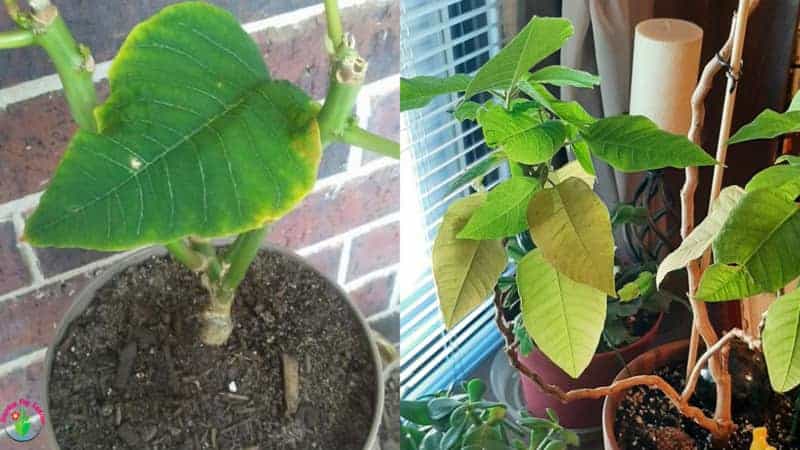
Unfortunately, they have developed a reputation for being difficult in that their leaves often turn yellow.
With the proper care and attention, this should not be an issue, and in this article, we will look at ways to avoid this problem.
The most common reason for a Poinsettia developing yellow leaves is that you are overwatering it. It is not the only reason, however. We will also look at correct light conditions, where to position your plant, and what pests you will likely encounter.
Contents
Causes of Poinsettia Leaves Turning Yellow
When thinking about house plants, it is always helpful to consider where your plant’s origins lie.
By doing this, you are better able to recreate similar conditions, which will help keep the plant’s stress levels low in its new environment.
The Poinsettia is native to the tropical forests of Mexico, where they will have received plenty of rain but also benefit from growing in free-draining soil. It will also have flourished due to a mild climate.
When the leaves turn yellow, you know that something is wrong and that some of the native conditions are not matching.
You must now identify the cause of the problem and rectify it quickly. We will now break those problems down individually.
Overwatering
With house plants, the most common cause of problems comes from overwatering. When the soil becomes waterlogged, the plant signals that it is unhappy via its leaves.
Not interpreting the signals correctly, the plant owner responds with more water, and instead of resolving the issue, he inadvertently exacerbates it.
Here is what you need to look out for so that you can avoid falling into that most common of traps:
- The leaves begin to go yellow from the bottom of the plant first. In the beginning, the signs may be relatively slight. The veins will become a lighter color than the rest of the leaf, and then the discoloration will gradually spread until the whole leaf is noticeably yellow. After that, the leaves will drop.
- The leaves start to wilt and become soggy and flaccid. There is a definite floppiness to the leaf texture here that is quite pronounced. They are not crisp or dry in any way.
- Any new leaves that appear are brown and sickly looking. They soon become dark brown and almost black in color and then either fail to thrive or simply fall off.
- New growth stops altogether as the plant struggles to survive. What you are now supporting is little more than the skeleton of the original plant.
- Soggy soil at the plant’s base with green algae is starting to reveal itself. This is probably the most obvious sign and will tell you that excess water is the source of the plant’s unhappiness.
- Root rot will be taking place below ground. If you tap the plant out of its pot, the soil around the roots will be soaked, and many of the roots may have turned black and become soft and mushy.
Correcting Over Watering Problems
The good news is that if you catch the problem in time, this is an easy issue to address.
Initially, one of the most significant skills you should work on is recognizing what your plant is telling you early on.
As soon as you see that your plant is unhappy and that overwatering is the cause, this is what you will need to do.
- First and foremost, stop watering and allow the plant to dry out. Very often, the plant will quickly recover if you just give the soil time to dry out.
- Check that there is sufficient drainage in the pot. If the hole in the bottom of the pot is not at least large enough for you to push a finger into, then the soil will not be able to drain fast enough. If you discover that that is the issue, you must repot your plant immediately. Find a pot roughly the same size as the current container but with a drainage hole this time. Tap the plant out of its pot, and remove any soggy soil around the root ball.
- If any of the roots are dark brown and soft, they are unlikely to be alive, and they can be snipped off using scissors or secateurs.
- Using a new, general-purpose houseplant potting soil, place a layer of the soil in the base of the pot. Then replant your Poinsettia to the original depth that it was planted before you remove it from its first pot. You will want to leave a gap of about one inch from the top of the soil to the top of the pot to allow watering.
- Firm the soil gently with your fingers and tap the pot’s base a few times so that any air gaps are filled around the roots.
- Usually, the potting mix you will be using will be slightly damp. Don’t water the plant for a few days, as there will be enough moisture in the soil to keep it going.
Only when the top inch of soil is dry will you need to water this plant, but we will look at watering regimes further in this article.
Underwatering
This is the second most common Poinsettia problem, and though some of the symptoms may be quite similar, there are some crucial factors that will enable you to differentiate between these two issues.
- Leaves throughout the plant start to become yellow but are often associated with dead leaf tips or borders.
- Leaves begin to wilt, but their texture is more brittle than when overwatering is the primary culprit.
- The plant struggles to remain upright, and the branches start drooping. When you correctly water your poinsettia, its leaves and stems are supported by the saturated cells they are made up of. As these cells dry out, the plant loses its ability to hold itself erect. In horticultural terms, this is known as turgidity.
- New growth is slow or non-existent.
- The potting soil is dry and parched. This will be the most obvious sign that this is where your problems lie and that this is not an overwatering issue. If you pick up some of the soil and rub it between your fingers, it will be dull and powdery rather than an absorbent living product.
By now, you will have read both lists, and you may be tempted to conclude that the symptoms are so similar that it is too difficult to tell them apart.
Here is where your sense of touch is essential. The texture of the leaf differs significantly between an overwatered and underwatered plant.
Plants that are overwatered feel soggy – think of an overcooked mushroom. On the other hand, underwatered plants err much more towards a brittle texture like autumn leaves.
The potting medium will be another reliable tell-tale sign. Soil is a living, breathing mass of microorganisms.
There are more micro-organisms in a single handful of healthy soil than the total number of people ever walking on this planet.
Healthy soil is the first step toward healthy plants, and there is no escaping that fact.
If you pick up a small amount of soil from your potted plant, it will quickly allow you to determine if too much water or too little water is the issue that needs to be dealt with.
Too wet, and it feels like something you picked up from a bog. Too dry, and it will have a dusty texture that you will almost be able to sense is lifeless.
Correct Watering Techniques
Getting your watering technique right is essential to plant care. Until you know how to do that properly, it will always seem like some sort of dark magic, and you will constantly be guessing whether to water or to let the plant dry out.
It is straightforward if you follow one of the two methods below.
- You want to soak your plant’s soil thoroughly and allow excess water to drain.
- Stand the pot in a plant saucer, basin, or kitchen sink and water it from the top until water starts to run out of the drainage hole in the bottom of the pot.
- Let that excess water drain away completely. Don’t leave your plant standing in a tray or saucer full of water because that prevents the water in the soil from draining sufficiently.
- Use distilled water or rainwater rather than tap water. Tap water contains salts and chlorine derived from the cleaning process, and these can build up in the potting soil and become toxic.
- An alternative method of watering is to stand the pot in a basin or sink of water and allow the soil to absorb it through osmosis. Once the top of the soil is wet, drain it like a plant watered from the top down.
- You should not water your Poinsettia again until the top inch of the soil is dry. The easiest way to establish this is to plunge your finger into the soil up to your first knuckle. If it is dry, it is time to repeat the watering process.
All of this may sound a little overwhelming, and you will have to trust me here, eventually, as you become familiar with your plant.
You can tell whether it needs watering or not simply by looking at it from across the room. I know that sounds unlikely, but with experience, you will soon get there.
Lighting
Incorrect lighting may also cause yellowing of the leaves in the Poinsettia.
Don’t forget that this is a forest plant and that tells us that although it likes bright light.
The light it will have received will have been dappled by the canopy of the surrounding trees.
If the plant receives too much light, its leaves will soon become pale and anemic. After that, they will become dry and crinkle up.
Solving the Problem
- Keep the plant out of the direct sun.
- Place it in a situation where it will receive a minimum of six hours of indirect light daily.
- Any leaves that have started to crinkle up should be cut off and disposed of.
Temperature
Here is another of those areas where you need to think back to the plant’s natural growing environment.
Between 65 and 70° F (18 – 21°c) is about the ideal, and rather conveniently, that is also an ideal temperature to keep a house heated. Don’t worry if you can’t get this exact.
However, if your house temperature regularly drops below 50°F (10°C) or gets warmer than 80°F (26°C), your plant’s leaves will become pale and soon start to drop off.
Correcting Temperature Issues
- Drafts: These are something that is quite common in modern homes, though we are often unaware of them. For example, don’t place your plant in front of a door that will regularly be opened and closed, thus exposing it to constantly changing temperatures.
- Look for a place in the room where the air is reasonably still, and the temperature is steady. Once you find an environment where your plant is happy, try to leave it there. They don’t do well if constantly being called on to adapt to different conditions.
- Always consider radiators or other indoor heating devices when positioning the plant. They can change the temperature rapidly and dry out the air.
- If you are unsure if the temperature in a room meets the plant’s needs, use a thermometer that will record the highest and lowest temperatures.
Pests
Some pests suck the sap from the leaves or the stems of your plants, which can gradually lead to a general leaf deterioration as the plant loses nutrients to the pests.
The two most common pests you will encounter in this regard are scale insects and woolly aphids. Both are sap-sucking creatures, though they look very different.
Scale insects hideout on the underside of leaves and look like green waxy bumps.
Woolly aphids conceal themselves in the leaf axils and look like tiny white pieces of cotton wool.
- Keen observation is always your best defense with house plants. Though with experience, you may be able to spot water issues at a distance, these guys are well disguised, so you will need to check closely to spot them timeously.
- If you catch them early and there are not too many of them, you can scrape them off with a fingernail or knife blade.
- If they get more established, try painting them with a neem-based pesticide on a cotton bud.
- Always dispose of dead and unhealthy leaves as these will allow pests a bridgehead from which to launch their attacks.
Diseases
Powdery mildew shows itself as a white, powder-like substance on the surface of poinsettia leaves.
The two most common cause is poor air circulation and wetting of the leaves when watering.
- When you water your plant, avoid wetting the leaves and either water from the bottom up or pour water onto the soil’s surface at the base of the plant.
- Keep the room your plants are growing in well-ventilated. This may sound like advice that contradicts that of avoiding drafts, but free-moving air is different from standing in a direct air current.
Humidity
Many house plants enjoy a certain amount of humidity and Poinsettias are no exception.
This is particularly relevant in an indoor setting where the central heating dries the air quickly.
If the air becomes too dry, the leaves will droop, yellow, and then curl with underwatering.
Read this article to know the causes of poinsettia leaves curling and how to fix the problem.
- Surround your plant with other plants. Together they will create their own mini microclimate that will be more humid.
- Fill the plant’s saucers with pebbles and then cover those with water. The pot’s base will not be wet, but the water will increase humidity as it evaporates.
- In drier regions, you can mist the plant with a fine spray from time to time.
- You may want to consider purchasing a plant humidifier in extreme conditions.
Feeding
If you give too much fertilizer, the Poinsettia will not thank you. Excess feeding causes the plant to struggle as it becomes almost toxic to the roots.
This, in turn, leads to the yellowing of the leaves. Another sign will be a salty crust on the soil’s surface.
- Firstly, it is best not to feed your Poinsettia at all while it is in flower.
- Outside the flowering season, feed once a fortnight with a general-purpose liquid plant feed over summer. During cooler months, when the plant is growing less actively, drop this feeding program to once a month, and then stop feeding altogether once flower bracts start to reveal themselves.
- If symptoms persist and you know you have been adding a lot of fertilizer, the best solution is to repot your plant.
Final Words
The Poinsettia is a delightful houseplant, and it may seem that many problems beset it. They are all relatively simple to deal with.
If you notice yellow leaves, consider the main problems first. Get the watering right and imitate its natural conditions as far as possible when choosing its position.
Finally, one other reason that the Poinsettia is sometimes somewhat maligned, both as a house plant or in the garden, is that it is regarded as not being toxic.
Recent tests have demonstrated that that is not the case, and the plant is perfectly safe in your house.


